Showing posts with label Tricks & Tips. Show all posts

Wednesday, 27 January 2016

How to Remove Your Number From Truecaller

Truecaller is a popular app which shows the contact details of the unknown person calling you. Yes this app's database is very large and used and with this app you can find any contact's detail which you don't have in your mobile as contact and also can block unwanted calls. This app allows you to search any number in the world for which you want to know. Actually Truecaller get the data fro its users contact book, yes if you have installed this app then it will read all your contact details and store it in their database. So even if you don't have installed the app but any of your friend or other which have your mobile number as contact have installed the Truecaller then your number will be in their database. You might not aware that for some fixed-line phones Truecaller also shows the address of the landline. I also know that is very bad as no one wants to show their personal information to strangers and Truecaller is doing the same. Truecaller data source is public data as people are giving access to this app to read their phonebook so the got the information about everyone. 

How to Remove Your Number From Truecaller

If anyone knows your mobile or landline number then he can easily find the registered address via internet public phonebook or also from Google by entering the number as search. So to be safe you have to remove your number from the database of Truecaller. But keep in mind that if you are using that app then you can't remove your number from their database. So you have deactivate your account from Truecaller and then you will be able to remove your number from this app. 

So be ready to remove Truecaller completely and if you are using this app on iPhone, Android or Windows Mobile then you can follow these below steps.

How To Deactivate Trucaller Account

In the iPhone you first have to open the app then tap the gear icon in the top right corner and here click on About Truecaller  and Scroll down where you will find Deactivate Truecaller click on it.

In the Android first open the app and tap the people icon in the upper left corner here select Settings and then navigate to About and click on Deactivate account.

In Windows Mobile open the app and you will see a three dots at bottom right corner tap on it and thn goto Settings and Help then click on Deactivate account.

So guys in these ways you can deactivate your Trucaller account after that you can start the steps to remove your number from Truecaller. See below how to do that:-

Steps to Remove Your Number From Truecaller

  • First open Unlist | Truecaller
  • Now here you have to provide the mobile number which you want to remove. But be sure you have added the country code in the starting like +919999999999
  • Now select the reason by tick or fill in other box.
  • Enter the Captcha code for verification and click on Unlist.
  • If you have deactivated the account then you will see a green button with a tick sign which means you have successfully removed your number from their database.
According to the Truecaller your number will be removed in 24 hours after the request for removal process. But wait it doesn't mean that you number will be removed from their database forever. Yes I am right I also removed my number near around 7-8 month before but now it was again appearing. So the conclusion is that they will again add your number after sometime by checking other's contact details. So you have to check it again and again after some months and if you found then again remove it and be happy and safe :)

If you found this guide about How to Remove Your Number From Truecaller useful then share it with others and help them too

Wednesday, 20 January 2016

How To Make Whatsapp Messenger Free For Lifetime

Whatsapp is the most used and popular messaging app of the smartphones and is also highly downloaded application of mobiles. Almost every smartphone user or internet user prefers whatsapp to use it as chatting bases instead of doing sms. As you can found a tons of other messaging apps on the play store or apple store but every users first choice is Whatsapp. Day by day whatsapp launching many new features in their app, as in the past they launched the web version of whatsapp where you can login online. Recently Facebook buy the Whatsapp and then they launched a range of new Emojies in new whatsapp version. Even we can also download the whatsapp on PC. Whatsapp also allow us to send text or media based messages and we can also create groups on Whatsapp to promote our business and we can also make calls on Whatsapp. But if you friend or contact don't have whatsapp installed on his/her smartphone then you can't chat with him/her. Now officially Whatsapp messenger belongs to Facebook which is also world's number one social media site. Firstly Whatsapp was come with the yearly subscription option as the user can use the app for one free and after the ending of one year he have to pay a little amount of 0.99$ which is not a big amount. But this amount was not deducted as lifetime membership yes this amount was only for one year subsription. As we all know whatsapp saves our lots of money because we can make calls, sms and also can send media and all the media, audio, video etc. an be send unlimited times. So after one year of free trail you have to pay little amount but as the most common users are facing in many reasons is they are not able to pay whatsapp service charge for payment method issue or others. As usually everyone loves the free things and almost every child or youngsters using this app and they also don't want to pay also their guardian or parents don’t allow them to use whatsapp. So for them we have a good news yes we have solution for those guys to make whatsapp free for lifetime. You just have to follow below given steps to make whatsapp service lifetime for free without paying any penny. Just follow the steps and make your whatsapp free for lifetime.

How To Make Whatsapp Messenger Free For Lifetime

How To Make Whatsapp Messenger Free For Lifetime

I am kidding here as there is no trick to make Whatsapp Messenger Free because it is Whatsapp's officially update as they have made their messaging app completely free. Yes they have send the officially notification to almost every user and also updated the news on their official blog. 

Recently on Monday Facebook who is the currently owner of Whatsapp announced that they are removing the yearly subscription fee from the whatsapp to make it free for all the users. But While announcing the plan today, WhatsApp's founder Jan Koum stated that the annual subscription fee was still a barrier to some users.
That's why we're happy to announce that WhatsApp will no longer charge subscription fees. For many years, we've asked some people to pay a fee for using WhatsApp after their first year. As we've grown, we've found that this approach hasn't worked well. Many WhatsApp users don't have a debit or credit card number and they worried they'd lose access to their friends and family after their first year. So over the next several weeks, we'll remove fees from the different versions of our app and WhatsApp will no longer charge you for our service. Source : Whatsapp Blog

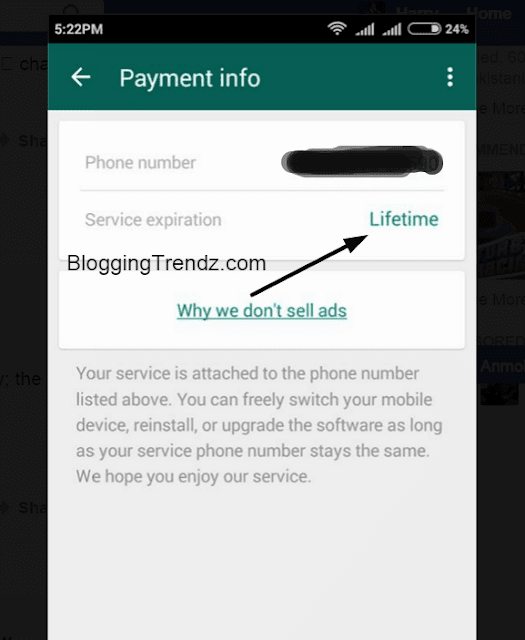
How To Check Your Whatsapp Membership Is Lifetime or Not?

Follow these steps and you will able to know about your subscription pack.

  • First open your whatsapp.
  • Go to Settings - Account and then Payment Info.
  • Here you will see the details like this.
How To Make Whatsapp Messenger Free For Lifetime

What is the Whatsapp Profit Then?

As we all know now these days money is first thing for everyone but as whatsapp never showed the ads on their messenger but they charge the user for yearly subscription. But as the latest update now they are not charging for the subscription too then how they will be earned from it? 

"Whatsapp said they won't replace the subscription with the third-party advertisement Instead, the company said it will explore ways businesses can use WhatsApp to connect with individuals, and will introduce new ways for users to communicate with businesses and organisations that will pay the company to target relevant communications with customers." reports thehackernews.

New ways means that any business company or other industry can use whatsapp paid account to communicate with it's customers or employees etc. Like any bank can use the paid version of Whatsapp to talk with it's customers about recent transactions or fraud activities etc.

So guys you are Whatsapp user right then share this news with others and make them also know about it :)

Sunday, 10 January 2016

How To Setup Custom Domain On Blogger With GoDaddy.com

As now these days everyone want to start his/her own business online and for this domain name is necessary and on Internet many websites like GoDaddy, Namecheap, BigRock etc. provides domain name. With domain name we can start our business online and also we can make money online from this domain. As to start business we not only need domain name but also hosting, which can host our blog and we can start posting the articles or other stuff on our blog. But Blogger.com is a best platform by Google which can host our blog for free. Yes this platform is best and we can add our domain on Blogger for free and start our business. In India Godaddy.com is best as their service is best and we can also apply some coupons and get the domain in just 99rs. from Godaddy. But when it comes to Setup Custom Domain On Blogger  then it is not easy for the newbies as it is little bit difficult for new users. But here I am to guide you How To Setup Custom Domain On Blogger With GoDaddy.com. Don't worry in this post I will show you the full guide on attach godaddy domain in blogger and you will understand it and can apply in very less time.

How To Setup Custom Domain On Blogger With GoDaddy.com


On Blogger.com we can create a blog like bloggingtrendz.blogspot.com but as it is difficult to remember so we can shrink it to bloggingtrendz.com. I think you understand now what is custom domain, so now come on the main topic. When we purchase the domain from any domain providing company then we have to change the A record and CNAME record according to our Blogger.com blog. So in this post I am going to show the steps to Setup Custom Domain On Blogger With GoDaddy.com.

Steps To Setup Custom Domain On Blogger GoDaddy.com

1. First off all you have to buy a domain from GoDaddy but keep in mind you don't need to purchase any other service from them as there is no need of website builder package or any other hosting. Because Blogger is hosting platform :) but you have to only buy the domain from GoDaddy and need the login information of the account of GoDaddy.

2. Now after domain registration on GoDaddy login into your account on GoDaddy but i am sure that you already login. Now here you can see Domain and other options. Here you have to click on Domains tab and then click on Manage DNS tab.

How To Setup Custom Domain On Blogger With GoDaddy.com
3. Now you will see three tabs on the top and here you have to choose DNS Zone File tab and then Click on Add Record Option.

How To Setup Custom Domain On Blogger With GoDaddy.com
4. Now choose CNAME Alias from drop-down menu as shown in the image below.
How To Setup Custom Domain On Blogger With GoDaddy.com


In the boxes you have to fill the following details.

First Box: CNAME (Alias)
Second Box: www
Third Box: ghs.google.com
Fourth Box: 1 Hour

Add this detail and click on ADD ANOTHER option.

4. Now you have to add four more records which will be under A (Host) section. Below I am sharing the records to fill. These details will be added in the same form but you have to only choose A (Host) from drop-down menu and start adding and in the end click on FINISH button.

 @ 216.239.32.21
 @ 216.239.34.21
 @ 216.239.36.21
 @ 216.239.38.21

How To Setup Custom Domain On Blogger With GoDaddy.com

5. Now you will be see a red colored message shown as below image. Click on Save Changes button.

How To Setup Custom Domain On Blogger With GoDaddy.com

Here you have almost completed the all requirements to Setup Custom Domain on Blogger With GoDaddy.com.

Now Publishing Blogspot Blog To Custom Domain

Now steps are for the blogger to attach that domain in blogger and publish it for all peoples. Don't get bored as we are only few steps away from completion.

1. Now have to navigate to Settings->Basic and then you will see a option Setup a 3rd party URL for your blog just click on that.

How To Setup Custom Domain On Blogger With GoDaddy.com
2. Enter the domain name like www.yourdomain.com which you have bought from GoDaddy and click on save button. But it will show an error same like as shown below.

How To Setup Custom Domain On Blogger With GoDaddy.com

The meaning of this error is that Blogger trying to verify that you are the owner of that blog by creating the CNAME (Alias) record on GoDaddy. So keep in mind that this is necessary step to attach the godaddy domain in blogger. In GoDaddy Host and Pints To should match with blogger error.

3. So go to GoDaddy again and click on Add Record again and select CNAME (Alias) and in the first box paste the first box add Name, Label or Host field which is under www and then in the second box add the Points To record then click on Finish option and click on Save Changes from top.

How To Setup Custom Domain On Blogger With GoDaddy.com

4. Now go back on Blogger and click on Save button. You can see that error has been gone away and domain is added. But you haven't completed yet as one more step is left. I know you are thinking what is behind, but you are forgetting that redirection is behind as you have to redirect the domain from yourdomain.com to www.yourdomain.com. So that is the way to redirect the domain automatically.

5. Click on Edit button and then Redirect box and then click on the Save button.

How To Setup Custom Domain On Blogger With GoDaddy.com

Finally the steps are completed and now your blog is visible to everyone and also it will redirect to www.yourdomain.com automatically.

Over To You

Guys it is completed but sometimes the DNS changes (CNAME and A Host) which we have made take some time. Near around 24-48 hours it will be changed if not worked in first 1 or 2 minutes. In my case it was done in just 2 or 3 minutes. I know my post is in full details and if you still need any suggestion or need any other help then you can comment below and ask me. 

If you think i have missed anything then feel free to remind me. Also share it with others and stay connected with us for more updates.